
Have you ever generated an AI video where the person looks perfectly clear, yet the whole shot still feels flat and fake?
The model usually isn't the problem. Your prompt is just missing one key detail: the aperture.
This guide walks you through the 4 most useful f-stops, when to use each one, and ready-to-copy prompts you can paste straight in.
Remember this one rule
The lower the f-number, the blurrier the background. The higher the f-number, the sharper the whole frame.
- f/1.4: only the eyes are sharp, and the background melts into soft round circles of light
- f/16: everything is sharp, from the ground at your feet to the horizon
The aperture is the opening inside the lens that lets light in. A lower f-number means a wider opening, and a wider opening means a blurrier background. You don't need to memorize the theory. The rule above is all you need.
The 4 f-stops at a glance
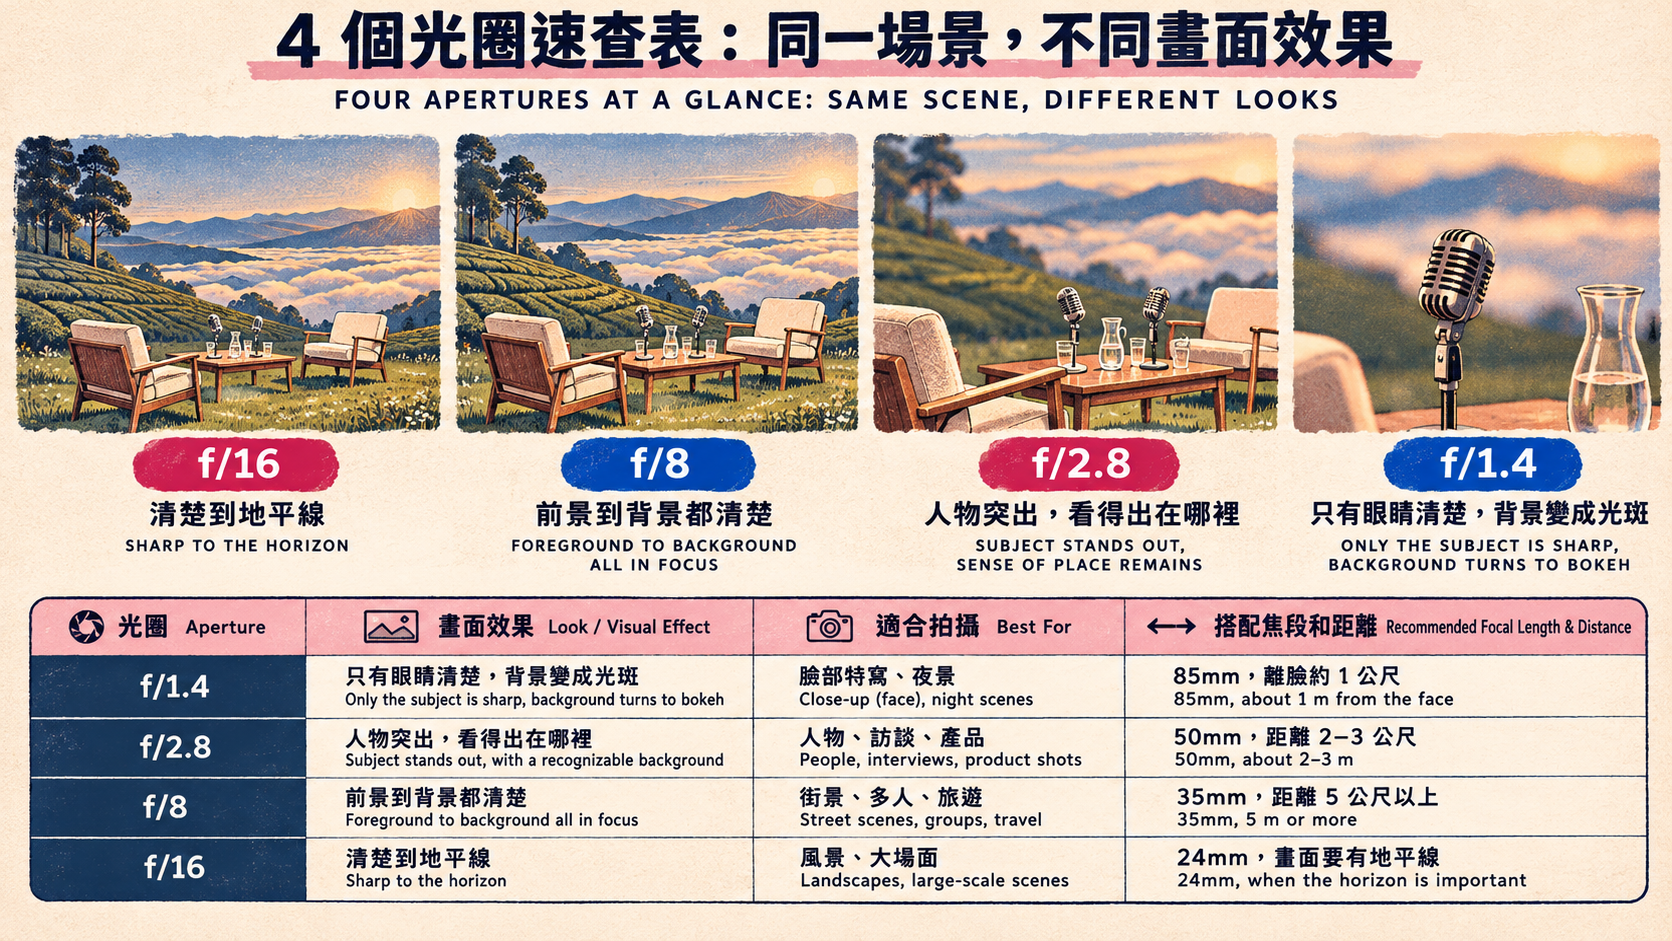
How to choose: ask yourself what the viewer most needs to see. If the face is the story, go low. If the place matters as much as the person, go high.
👉 Claim 500 free credits and start creating now!
3 keys to making the aperture actually work
1. Write the number and the result A model can easily ignore "f/1.4" on its own. Describe what you want to see instead, for example: "only her eyes are sharp, and the lanterns behind her melt into large, soft, round circles of light." That sentence does most of the work.
2. Pair the aperture with a lens and a distance The f-stop isn't the only thing that controls blur. At the same f/2.8, an 85mm lens close to a face blurs the background far more than a 24mm lens across a street. That's why every f-stop below comes with a lens and a distance.
3. Describe the brightness separately On a real camera, the aperture changes how bright the image is. In an AI prompt, it doesn't. The f-stop only controls what is sharp and what is soft, so set the brightness by describing the light itself, such as "warm lantern light" or "low early-morning sun."
f/1.4: only the eyes are sharp (the dreamy close-up)
- When to use it: close-ups where the emotion matters more than the place, such as a glance, an expression or a night scene.
- Pair it with: an 85mm lens, about 1 meter from the face. The farther the background is behind the subject, the softer it gets.
- Keep in mind: the sharp zone is only a centimeter or two deep, so keep the action small, like a blink, a glance or a breath. If the person moves toward or away from the camera, they'll slip out of focus.
Lens block (replace the [brackets] with your own details)
Shot on an 85mm lens at f/1.4, the camera about 1 meter from [the subject]'s face. The focus is only on [the eyes], and the ears and the ends of the hair are already slightly soft. [The lights behind them] all melt into large, soft, round circles of light with no readable detail.
Example: a rainy night in Jiufen
A face close-up on the old stone steps of Jiufen, Taiwan, on a rainy night, one continuous shot. A young blonde woman in thin silver rimless glasses and a long black leather trench coat stands under a dripping eave, looks straight into the lens, then slowly lowers her gaze. Shot on an 85mm lens at f/1.4, the camera about 1 meter from her face: only her eyes are sharp, and the focus stays on her eyes for the whole shot. The strings of red lanterns and the warm window light behind her melt into large, soft, creamy circles of light, and the fine rain turns into thin bright streaks in the glow. The key light is warm amber lantern light from the upper left. The camera pushes in very slowly. Sound: light rain, water dripping from the eaves. No music, no text on screen.
f/2.8: the subject pops and the place stays readable (the everyday portrait)
- When to use it: people at work, conversations, interviews and products, whenever the viewer should understand where the scene takes place.
- Pair it with: a 50mm lens, 2–3 meters from the subject, with the background a few meters behind them.
- Keep in mind: if two people are at different distances from the camera, only one may be sharp. Keep them side by side, or say which one the focus is on.
Lens block
Shot on a 50mm lens at f/2.8, the camera about 2.5 meters from [the subject]. [The subject] is sharp from head to hands, and [the setting behind them] is softly blurred but still easy to recognize.
Example: a railway bento at an old train station
A medium shot in the waiting hall of a 1930s Taiwanese train station in the morning, one continuous shot. A woman with long, straight black hair in a cream-white long coat with a big fluffy fur collar sits on a dark wooden bench, a round stainless-steel railway bento box on her lap. She picks up a braised egg with her chopsticks, takes a bite, and glances up at the camera while chewing. Shot on a 50mm lens at f/2.8, the camera about 2.5 meters from her: she is sharp from head to hands, while the tall arched windows, the beams of light, the columns and the old station clock behind her are softly blurred but clearly an old train station. Cool cyan window light falls in at an angle from the back left, with a little warm glow from the pendant lamps. The camera pushes in just slightly. Sound: the echo of the hall, footsteps, chopsticks tapping the bento box. No music, no text on screen.
👉 Claim 500 free credits and start creating now!
f/8: sharp from front to back (the street shot)
- When to use it: street scenes, people walking, groups and travel, whenever the viewer should be able to read the whole location.
- Pair it with: a 35mm lens, 5 meters away or more. If the camera gets much closer, the far background starts to soften again.
- Keep in mind: some models blur the background out of habit, so name the far details that must stay sharp, such as windows, arcades or a person at the end of the street.
Lens block
Shot on a 35mm lens at f/8 with deep focus, the camera about 5 meters from [the subject]. Everything is sharp, from [the nearest detail] at the front of the frame to [the farthest detail] behind, with no background blur.
Example: an old street in Dadaocheng
A street scene on an old street in Dadaocheng, Taipei, early in the morning, one continuous shot. Two young women walk side by side from the far end of the street toward the camera, chatting and laughing, while a light-tan Taiwanese street dog trots beside them. Shot on a 35mm lens at f/8 with deep focus, the camera about 5 meters in front of them: everything is sharp, from the stone paving at the bottom of the frame to the red-brick Baroque facades, the dark green shutters and the bamboo baskets under the arcades on both sides, all the way to the end of the street. Low morning sun shines straight down the street from the far end, backlighting the scene and casting long shadows. The camera walks slowly backward with them, keeping the same distance. Sound: footsteps, sparrows, scooters in the distance. No music, no text or readable signs.
👉 Claim 500 free credits and start creating now!
f/16: sharp to the horizon (the big view)
- When to use it: landscapes, opening establishing shots, architecture, or any shot where a person should look small against a big view.
- Pair it with: a 24mm lens with the horizon in frame. List every far detail you want to stay crisp.
- Keep in mind: a thin haze is fine because it only lowers the contrast, but heavy haze makes the distance look out of focus.
Lens block
Shot on a 24mm lens at f/16 with deep focus. Everything is sharp, from [the nearest detail] all the way to [the far horizon], with crisp detail in the far distance and no background blur.
Example: a bamboo raft at sunrise
A mountain lake in the style of Sun Moon Lake, Taiwan, at sunrise, one continuous shot. An old fisherman in a conical bamboo hat stands at the front of a bamboo raft, pushing it along with a long pole, while a white egret perches on top of his hat. Shot on a 24mm lens at f/16 with deep focus: the fisherman is sharp, and so is everything behind him, from the row of bamboo rafts, the emerald-green water and the small island in the middle to the layers of mountain ridges and the horizon. The sun has just risen over the ridge at the upper right, forming a sharp sunstar and a golden path of light across the water, with only a thin haze. The camera slowly pulls back and rises like a drone. Sound: wind over the lake, the pole dipping into the water, water birds. No music, no background blur, no text on screen.
The 3 most common mistakes
Mistake 1: only writing "shallow depth of field, blurry background"
A woman eating at a night market, cinematic, shallow depth of field, blurry background.
The model doesn't know how much blur you want or where the focus should be, so you might get a faint haze or a blurry face.
Write it like this instead:
A face close-up of a woman at a night market food stall, shot on an 85mm lens at f/1.4, the camera about 1 meter from her face. The focus is on her eyes, and her ears are already slightly soft. The bulbs and lights of the stalls behind her melt into large, soft, round circles of light.
Every sentence controls something you can see: the lens and distance, where the focus is, and what the background turns into.
Mistake 2: asking for two kinds of focus at once
Face close-up at f/1.4, everything sharp from her eyes to the street outside the window.
"f/1.4" and "everything sharp" contradict each other, so the model will just pick one.
Also, if you add a saved style line to the end of every prompt (such as "cinematic, shallow depth of field, bokeh"), delete it when you want f/8 or f/16. Otherwise it will fight the f-stop.
Mistake 3: nothing bright behind the subject
Round circles of light come from small, bright light sources behind your subject: lanterns, string lights, street lamps, candles or sunlight through leaves. If there's only a plain wall back there, it will blur into a flat wash of color.
👉 Claim 500 free credits and start creating now!
Advanced: move the focus mid-shot
Moving the focus from one thing to another during a shot is called a rack focus, and it only shows when the depth of field is shallow.
Three rules: use f/1.4 or f/2.8, put the two targets at very different distances from the camera, and say exactly when the focus changes.
A medium close-up at a night market food stall, one continuous shot with a locked-off camera. A cup of bubble tea sits on the table close to the lens, and a young woman sits behind it, about 1 meter farther back. Shot on a 50mm lens at f/1.4. For the first 2 seconds the focus is on the bubble tea cup and its water droplets, and she is just a soft shape behind it. Then she looks up, and the focus pulls smoothly from the cup to her eyes over about 1 second; the cup goes soft, and her face becomes sharp and stays sharp to the end. The stall bulbs behind her stay as round circles of light the whole time. Warm yellow light. Sound: night market chatter, oil sizzling in a wok. No music, no text on screen.
Rack focus is one of the harder things for an AI video model, so expect to try a few takes. Keep the camera still so the focus shift is the only thing that changes.
When the focus comes out wrong
Tip: change one thing at a time, so you can see which fix actually worked.
Your template: build your own aperture prompt
Replace the [brackets] with your own details and delete anything your shot doesn't need. Always keep the sentence about what is sharp and what is soft.
[Shot size] of [subject] [doing one simple action] in [location], [time of day and light]. Shot on a [focal length] lens at [f-stop], the camera about [distance] from [subject]. The focus is on [one focus target], [what else is sharp or slightly soft]. Behind them, [background details] [background wording from the table below]. The camera [one simple movement].
Background wording by f-stop
What about the stops in between? f/2, f/4, f/5.6 and f/11 all sit between these four. Each step to a higher number makes a little more of the scene sharp. For example, f/4 shows a little more of the room than f/2.8, and f/11 sits between the street look of f/8 and the landscape look of f/16.
Want to start from an image?
- Generate an image first, and check that what is sharp and what is soft is exactly what you want.
- Use that image as the first frame in a video model such as Seedance 2.5.
- In your video prompt, keep only the action, camera and sound lines, then add: "Keep the focus exactly as it is in the image."
This is the most reliable way to keep the focus from drifting during the video.
Final thoughts
The aperture isn't just for photographers. In an AI prompt, it's simply a switch that tells the model what should be sharp and what should be soft. Remember the 4 numbers, always describe the result you want to see, and your AI videos will go from looking fake to looking truly cinematic.
Pick an f-stop and try one of the prompts above right now!